Search This Blog

Showing posts with label cookies. Show all posts

Friday, October 15, 2010

Frosting Fridays

I thought I would start something new on the blog - at least for the next few weeks - where every Friday will be all about frosting :) And that is also pretty much how I came up with the oh so clever name "Frosting Fridays".

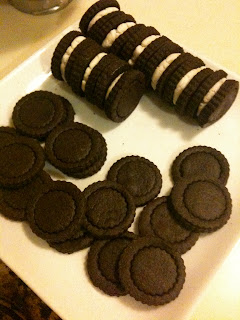
Since Wednesday's post was all about cookie cutter cookies (and since I promised you a frosting that would go nicely with said cookies) the first official Frosting Friday Frosting will be... Royal Icing.

Royal Icing is pretty darn awesome for a number of reasons. It is super simple to make, it does not take much time to prepare, it hardens as it dries (making it ideal for decorating cookies) and since it is pure white you can color it with coloring gel. You can find icing coloring gels at craft stores and cooking specialty shops or online here.

So here is what you need:

5 cups of confectioners sugar
3 egg whites
1 teaspoon of vanilla extract

Icing colors
Decorating bags and tips (or multiple ziplock sandwich bags)
Toothpicks

In a mixer, whip egg whites until they are white and foamy.
Slowly add the sugar.
Once all of the sugar has been added add the vanilla extract.
Allow mixer to run for 7-8 minutes.
And that is it :)

I told you it was easy.

The hard part is actually working with the icing. Royal icing dries super quickly so it is best to have a game plan in place before you begin to even make your cookies. When you are not using the icing it is best to cover the top of your bowls with a clean, damp cloth.

You will need two types of icing per each cookie. A thick icing to outline the cookie and a slightly thinned icing to fill it (this is called flooding the cookie). For the cookie below I needed four different types of icing: A thick white icing to outline the entire cookie and tooutline the logo in the middle, a thin white icing to fill the cookie outside of the logo outline, a thin purple icing the fill the inside of the logo and a thick dark purple icing to write the letters. You will also need a frosting bag with a tip or a zip lock bag for each color and thickness.


The directions below are for how to outline and fill a cookie with white icing:

No matter what colors you choose to play around with in the end you will always want to keep the majority of your icing white and thick. So start by taking a few spoonfuls and putting it into either your frosting bag or into one corner of your ziplock bag. If you are using a ziplock bag squeeze all of your icing into one corner and carefully cut off a tiny part of the corner allowing the icing to be piped out. Carefully outline your cookie.

To thin out your icing, spoon  about 1/4 of a cup into a bowl and slowly add water and mix. You want the icing just thin enough so that it will have a ribbon effect when coming off of the spoon. Follow the same instructions for filling a ziplock bag (or, just fill your next decorating bag) and fill in the middle section of your cookie. Be careful not to over flow the edges!! You can use a toothpick to help guide the icing around the cookie and to pop and air bubbles you see.

Always let your cookies dry over night on a baking sheet or cooling rack! If you do not let them fully dry you will end up with fingerprints and smudges all over.

Once you have the hang of outlining and flooding your cookies try adding some coloring. The directions for how to pipe the outline and how to flood the cookie are the same no matter what color icing you are using and no matter how big (or how small) your cookie is.

Enjoy!!

Wednesday, October 13, 2010

Cookie Cutter Cookies

I'll admit, I've only ever ventured into the world of cookie cutter cookies around Christmas. There is nothing like going home and crowding around the counter with my mom and my brothers cheerfully baking Christmas cookies or ummm.... more realistically, arguing over who makes the best cookies, who will be stuck with the toy soldier cookie cutter (that darn cookie burns every single time) and who used the last of the red sprinkles. Either way - a totally awesome time :)

But this time I had something a little more creative in mind. My cousin M is pregnant and due in late November. Super exciting as this is my first cousin to have a little nugget. Sadly, I was unable to make it home to RI for her baby shower but I still wanted to send her a little something to let her know I wish I could have been there. And then it came to me - baby themed cookies! Naturally I used it as an excuse to go to Sur La Table to browse the cookie cutter section - they seriously have great cookie cutters, usually under $1 each! Don't believe me? Check it out for yourself here. Also my cousin C's new show Pictureka! premiered this week on the Hub Network. So... I also had to make some celebratory cookies to ship out to LA.

Cookie Ingredients

3 cups of all purpose flour
2 teaspoons baking soda
1 cup of sugar
2 sticks of butter
1 egg
1/4 teaspoon pure almond extract (Optional)
1 teaspoon pure vanilla extract

Preheat oven to 350*

My prep!
Combine the flour and baking soda in a medium sized bowl and set aside.
Cream the butter and sugar together.
Add the egg and extract (s).

The butter, sugar, egg and extract doing their thing!
Slowly add the flour mixture.
Once combined roll dough out onto a well floured counter. (It helps to coat the cookie cutters in flour as well).


Bake for 10-12 minutes or just until the edges are just golden brown.
Allow cookies to COOL COMPLETELY and then frost to your liking :)
(Also, you can decorate with sprinkles and colored sugar prior to baking)

I decided to go with royal icing for the cookies. I'll be posting that recipe on Friday so check back!

The baby themed cookies for M!
The Hub and Pictureka! themed cookies for C
Close Up!

Monday, October 4, 2010

I scream, you scream, we all scream for ice cream!

OK, so maybe the first week with real fall weather isn't the best time to write a post about ice cream.... but lets face it is there really a bad time for ice cream? I didn't think so :)

My favorite KitchenAid Stand Mixer accessory is hands down the Ice Cream Maker Attachment (as seen here). It is super easy to use and once you find the perfect recipe it is pretty darn hard to mess up the process. Once you make your first batch I promise you will be hooked! You can make super rich, decadent chocolate ice cream or change up a few ingredients and have a skim milk version that tastes just as creamy.

There are all sorts of ice cream recipes - some are custard based (with eggs) and some are "simple" (milk, cream, sugar, flavoring). Some require you to cook the ingredients beforehand and others just have you give it a quick stir. No matter what type of recipe you chose there is one tip you want to remember when making ice cream. Before you pour your ingredients into you ice cream maker give it time to chill. chill. Chill. Did you get that? It really makes a huge difference. Your ice cream maker will be ice cold and if you pour in a mixture that is closer to room temp you will end up with a grainy final product rather than a smooth, silky ice cream. So have some patience, let it chill in the refrigerator until it is cold to the touch.

My favorite ice cream has always been mint chocolate chip. Bonus points if it is mint cookies and cream! (again, not exactly a fall flavor but I will give you a substitution in the recipe to make cookies and cream ice cream AND mint cookies and cream). If you chose to make the vanilla base you can go ahead and toss in any "mix in" you desire - chocolate chips, cut up pieces of your favorite candy bar, caramel, fudge - go nuts!

Mint Cookies and Cream Ice Cream
Ingredients

2 cups of milk
2 cups of heavy cream
1 cup of sugar
1/2 teaspoon salt
1 teaspoon vanilla extract (Make this two teaspoons and leave out the mint extract if you would like a vanilla ice cream)
1 teaspoon mint extract
1 cup crushed cookies (left overs from this recipe are perfect)

In a large bowl stir together the milk, cream, sugar, salt and extracts.
Stir until the sugar has disolved.
Let sit in the refrigerator for 30 minutes.
While the mixture is "chilling" assemble your ice cream maker.
Pour the mixture into your maker and freeze according to manufacturer instructions adding the cookies at the end.
For KitchenAid ice cream makers the process should take less than 30 minutes.

2 minutes in
15 minutes in
25 minutes in

Your ice cream will be the consistency of  soft-serve.
Stir in your cookies and then spoon into freezer proof containers.
Let your ice cream stay in the freezer for 2 hours before serving.
Enjoy!

The Final Product!


Monday, September 27, 2010

Milk and Cookies

Hi Everyone! So sorry for the time away from the blog - I hope you all aren't too upset. I had a few "bumps in the road" here that held me up for a bit but all is well now :) (For those of you wondering, I was mugged while on the DC metro system and, unfortunately, my iPhone with all my wonderful baking pictures was stolen, but as I said all is well now).

So... I was going to write a post about these AMAZING corn muffins I made last night. But then I thought no, it is not exciting enough (look for that post on Wednesday!) I felt like I needed to come back with a post that you could get really excited about, something you would really want to try. How about homemade Oreo Cookies?

I thought that might get your attention :)


I love Oreo Cookies (well, c'mon, who doesn't?!). There is something about the chocolate cookie and the cream filling that just hits the spot. However, I'm not a fan of ingredients that I cannot pronounce and sadly the nutrition label on the Oreo bag has one to many for my liking.

A few quick notes before you start. The recipe calls for dutch process cocoa - this is what will give your cookies the iconic color of a real Oreo, you know the kind that will leave little bits of black cookie on your teeth when you bite into it. However, dutch process cocoa is sometimes hard to find so you can use regular cocoa powder as well. Recently Hershey's has come out with a "Special Dark Cocoa" which is a blend of Dutch process and natural cocoa and it is what I used when making the cookies and it worked well. And beware, this recipe get messy!! I hope you enjoy the cookies!


Chocolate Cookies
Ingredients


2 and 1/2 cups of all purpose flour
1/2 cup of dutch process cocoa (you can also use natural cocoa powder)
1/2 teaspoon of salt (kosher salt works best, but table salt can be used)
1 cup of unsalted butter
1 cup of sugar
1 egg
1 teaspoon of vanilla

Preheat Oven to 350*. Line baking sheets with parchment paper (this will make your clean up a breeze)

Mix together the flour, cocoa and salt in a medium bowl, set aside.


Cream together the butter and sugar until light and fluffy


Beat in the egg and vanilla until well combined.
Add the flour mixture in very slowly, allowing the mixture to become fully combined before the next addition.

Once your dough has come together roll out on a surface "floured" with flour and cocoa. Your dough will look dry, but do not worry, it should :)
This is where it starts to get really messy!


Even as you roll out your dough it will still seem kind of dry and crumbly, yet it will stick to the rolling pin, just make sure to flour your rolling pin as you go along and you will be fine. I would suggest rolling it fairly thin, this will ensure that they will cook thoroughly. (Think back to making Christmas cookies with mom... the the thinner the cookie the crispier it was).

Then take a cookie cutter of your choice and cut away! I used a small fluted biscuit cutter and then went back and left an impression of a second smaller cutter as a design.

"Flouring" your cutter with flour and cocoa will help the dough from sticking.
These cookies will not expand as you cook them so you don't have to worry about having too much space between each one on the sheet. Once you place them onto the baking sheet put them in the freezer for 5 minutes.

Bake at 350* for 8 minutes (for thin cookies) and up to 10 for slightly thicker cookies.
Let the cookies cool before filling!

Cream Filling
Ingredients 

1 teaspoon plus 1/4 teaspoon of unflavored gelatin
2 tablespoons of COLD water
(Bowl of hot water)
1/2 cup of shortening (such as Crisco)
1 teaspoon vanilla
2 and 1/2 cups of powdered sugar

Stir together the gelatin and cold water in a small bowl or cup. Place the cup/bowl into the hot water and let sit for 5 minutes or until the mixture become transparent (it will not be completely clear depending on the brand you are using).  Remove the cup from the hot water and let it sit for 5 minutes.

In a medium size bowl beat the shortening until it starts to become fluffy
Add the vanilla
On LOW speed, a few heaping tablespoons at a time, add the powdered sugar
Once all of the powdered sugar has been incorporated add in the gelatin mixture
Make sure that everything has mixed together

To make the cookie sandwiches place about a teaspoon of cream filling onto an upside down cookie, add a second cookie right side up and gently press together. And voila! Homemade Oreo cookies :)

If you make your cookies about the size of the original you will end up with about 30 cookie sandwiches. I made my cookies a bit on the thicker side and had 24 cookie sandwiches!

Enjoy!

Friday, August 13, 2010

"Nestle Toulouse"

One of my favorite episodes of Friends centers around Monica and her quest to recreate Phoebe's Grandmother's chocolate chip cookie recipe (appropriately named "The One With Phoebe's Cookies"). Monica tries every variation of a chocolate chip cookie recipe she can think of with no success only to hear Phoebe declare that she remembered her Grandmother saying she got the recipe from a French friend name "Nestle Toulouse".  <Insert canned laughter here> The episode cracks me up each and every time I see it mostly because I can relate. My own Grandmother's "secret" chocolate chip cookie recipe is printed on the back of that yellow bag of chocolate chips. And her sugar cookie recipe? Well, lets just say I have the cut off side of what I can only guess was a baking soda box from 1952.

But seriously, is there anything better than a classic Nestle Toll House chocolate chip cookie?

J had requested a dessert to bring into the office today so naturally I went directly to my Old Faithful.. the chocolate chip cookie.

Don't you just want a spoon??


I have only two simple recommendations when making the cookies. The first is USE BUTTER! Specifically, use unsalted butter. (This is actually a great guideline for any sort of baking adventure you find yourself embarking on). And the second is learning that your refrigerator is your best friend. If you are baking in a hot kitchen or if you live in a hot and humid climate your dough will start to become too soft. There is a fine line between softened dough that you can spoon onto a cookie tray and dough that is already melting that will give you flat, thin cookies.

I love my iPhone, but I really need to invest in a real camera.


And for those of you who do not have the Toll House Cookie recipe you can find it here. The only thing left to do... go get a glass of milk and enjoy!

The final product!


Just in case J forgets who made the cookies for him :)