So... I was going to write a post about these AMAZING corn muffins I made last night. But then I thought no, it is not exciting enough (look for that post on Wednesday!) I felt like I needed to come back with a post that you could get really excited about, something you would really want to try. How about homemade Oreo Cookies?
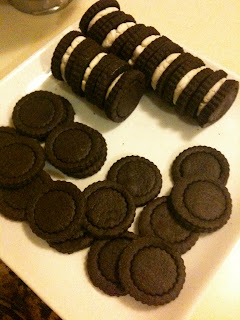 |
| I thought that might get your attention :) |
I love Oreo Cookies (well, c'mon, who doesn't?!). There is something about the chocolate cookie and the cream filling that just hits the spot. However, I'm not a fan of ingredients that I cannot pronounce and sadly the nutrition label on the Oreo bag has one to many for my liking.
A few quick notes before you start. The recipe calls for dutch process cocoa - this is what will give your cookies the iconic color of a real Oreo, you know the kind that will leave little bits of black cookie on your teeth when you bite into it. However, dutch process cocoa is sometimes hard to find so you can use regular cocoa powder as well. Recently Hershey's has come out with a "Special Dark Cocoa" which is a blend of Dutch process and natural cocoa and it is what I used when making the cookies and it worked well. And beware, this recipe get messy!! I hope you enjoy the cookies!
Chocolate Cookies
Ingredients
2 and 1/2 cups of all purpose flour
1/2 cup of dutch process cocoa (you can also use natural cocoa powder)
1/2 teaspoon of salt (kosher salt works best, but table salt can be used)
1 cup of unsalted butter
1 cup of sugar
1 egg
1 teaspoon of vanilla
Preheat Oven to 350*. Line baking sheets with parchment paper (this will make your clean up a breeze)
Mix together the flour, cocoa and salt in a medium bowl, set aside.


Cream together the butter and sugar until light and fluffy

Beat in the egg and vanilla until well combined.
Add the flour mixture in very slowly, allowing the mixture to become fully combined before the next addition.


Once your dough has come together roll out on a surface "floured" with flour and cocoa. Your dough will look dry, but do not worry, it should :)
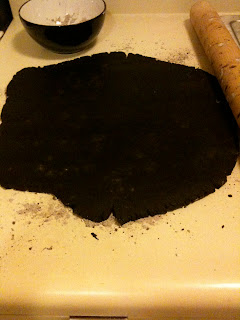 | ||
| This is where it starts to get really messy! |
Even as you roll out your dough it will still seem kind of dry and crumbly, yet it will stick to the rolling pin, just make sure to flour your rolling pin as you go along and you will be fine. I would suggest rolling it fairly thin, this will ensure that they will cook thoroughly. (Think back to making Christmas cookies with mom... the the thinner the cookie the crispier it was).
Then take a cookie cutter of your choice and cut away! I used a small fluted biscuit cutter and then went back and left an impression of a second smaller cutter as a design.
 |
| "Flouring" your cutter with flour and cocoa will help the dough from sticking. |
Bake at 350* for 8 minutes (for thin cookies) and up to 10 for slightly thicker cookies.
Let the cookies cool before filling!
Cream Filling
Ingredients
1 teaspoon plus 1/4 teaspoon of unflavored gelatin
2 tablespoons of COLD water
(Bowl of hot water)
1/2 cup of shortening (such as Crisco)
1 teaspoon vanilla
2 and 1/2 cups of powdered sugar
Stir together the gelatin and cold water in a small bowl or cup. Place the cup/bowl into the hot water and let sit for 5 minutes or until the mixture become transparent (it will not be completely clear depending on the brand you are using). Remove the cup from the hot water and let it sit for 5 minutes.
In a medium size bowl beat the shortening until it starts to become fluffy
Add the vanilla
On LOW speed, a few heaping tablespoons at a time, add the powdered sugar
Once all of the powdered sugar has been incorporated add in the gelatin mixture
Make sure that everything has mixed together
To make the cookie sandwiches place about a teaspoon of cream filling onto an upside down cookie, add a second cookie right side up and gently press together. And voila! Homemade Oreo cookies :)
If you make your cookies about the size of the original you will end up with about 30 cookie sandwiches. I made my cookies a bit on the thicker side and had 24 cookie sandwiches!
Enjoy!


