Search This Blog

Wednesday, September 29, 2010

M is for Muffin

Growing up I was a pretty picky eater. There were tons of foods that I would not even consider trying and would just push away... onions, blueberries, gravy, mashed potatoes, bananas... just to list a few. Fortunately, these days, I can proudly say that I have grown out of most of my food aversions :)

One thing I have always LOVED is a warm, homemade corn muffin. There is something about those golden little muffins that I cannot resist. Personally, I prefer my muffins to have a little bit of sweetness to them, not sugary or candy-like, just a little sweet from a touch of honey. I know that this immediately will make my version of corn muffins a "no go" for any southerners. Traditionally southern cornbread is not sweet and you will very rarely see a southern corn muffin. You will sometimes hear the sweeter kinds referred to as "Yankee cornbread".

Obviously, corn meal is the most important ingredient in the corn muffin and in my opinion it just comes down to personal preference. There is yellow or white corn meal and for the recipe below it is really up to you. In the south, you will normally see white corn meal, but I grew up on corn muffins made from the Jiffy box so I'm partial to the yellow corn meal. One thing you want to avoid picking up while shopping for corn meal is a "corn meal mix". This is not referring to the boxed muffin or cornbread mixes but rather a blend of corn meal and flour with a touch of a few other ingredients. Make sure you read the packaging closely and pick up one that is plain corn meal :)

And my last quick note before the baking starts. This recipe calls for 1 cup of milk and you can actually use any kind! For a more tender muffin stick with whole milk. You can certainly use skim milk (I have!) but beware that they might have a bit of a dry texture so pull them out of the oven a minute earlier than recommended :)

Enjoy!

Honey Corn Muffins
Ingredients

1 cup corn meal (yellow or white) 
1 cup flour
1 tablespoon baking powder
1/2 cup sugar
1 teaspoon salt
1 cup of milk
2 large eggs
4 tablespoons of butter, melted
1/4 cup of honey

Preheat oven to 400*

In a large bowl, combine corn meal, flour, baking powder, sugar and salt.
In a second bowl, whisk together the milk, eggs, butter and honey.

Wet and dry ingredients
Add the wet ingredients to the dry ingredients.
Stir just long enough to combine all of the ingredients, this is a batter you do not want to overwork.
Let rest for 5 minutes.
Place muffin liners in a 12-muffin pan.
Evenly divide mix to make 12 muffins.

Filled muffin pan :)

Bake for 15 minutes, or until golden brown on top.

Yummmm
Let cool for a few minutes and then enjoy!

The final product, just waiting to be enjoyed!

Monday, September 27, 2010

Milk and Cookies

Hi Everyone! So sorry for the time away from the blog - I hope you all aren't too upset. I had a few "bumps in the road" here that held me up for a bit but all is well now :) (For those of you wondering, I was mugged while on the DC metro system and, unfortunately, my iPhone with all my wonderful baking pictures was stolen, but as I said all is well now).

So... I was going to write a post about these AMAZING corn muffins I made last night. But then I thought no, it is not exciting enough (look for that post on Wednesday!) I felt like I needed to come back with a post that you could get really excited about, something you would really want to try. How about homemade Oreo Cookies?
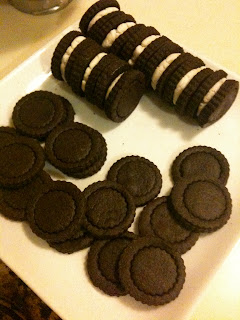
I thought that might get your attention :)


I love Oreo Cookies (well, c'mon, who doesn't?!). There is something about the chocolate cookie and the cream filling that just hits the spot. However, I'm not a fan of ingredients that I cannot pronounce and sadly the nutrition label on the Oreo bag has one to many for my liking.

A few quick notes before you start. The recipe calls for dutch process cocoa - this is what will give your cookies the iconic color of a real Oreo, you know the kind that will leave little bits of black cookie on your teeth when you bite into it. However, dutch process cocoa is sometimes hard to find so you can use regular cocoa powder as well. Recently Hershey's has come out with a "Special Dark Cocoa" which is a blend of Dutch process and natural cocoa and it is what I used when making the cookies and it worked well. And beware, this recipe get messy!! I hope you enjoy the cookies!


Chocolate Cookies
Ingredients


2 and 1/2 cups of all purpose flour
1/2 cup of dutch process cocoa (you can also use natural cocoa powder)
1/2 teaspoon of salt (kosher salt works best, but table salt can be used)
1 cup of unsalted butter
1 cup of sugar
1 egg
1 teaspoon of vanilla

Preheat Oven to 350*. Line baking sheets with parchment paper (this will make your clean up a breeze)

Mix together the flour, cocoa and salt in a medium bowl, set aside.


Cream together the butter and sugar until light and fluffy


Beat in the egg and vanilla until well combined.
Add the flour mixture in very slowly, allowing the mixture to become fully combined before the next addition.

Once your dough has come together roll out on a surface "floured" with flour and cocoa. Your dough will look dry, but do not worry, it should :)
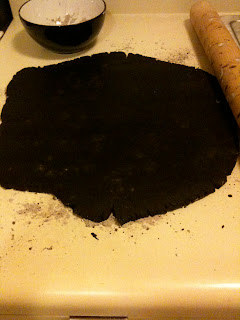
This is where it starts to get really messy!


Even as you roll out your dough it will still seem kind of dry and crumbly, yet it will stick to the rolling pin, just make sure to flour your rolling pin as you go along and you will be fine. I would suggest rolling it fairly thin, this will ensure that they will cook thoroughly. (Think back to making Christmas cookies with mom... the the thinner the cookie the crispier it was).

Then take a cookie cutter of your choice and cut away! I used a small fluted biscuit cutter and then went back and left an impression of a second smaller cutter as a design.

"Flouring" your cutter with flour and cocoa will help the dough from sticking.
These cookies will not expand as you cook them so you don't have to worry about having too much space between each one on the sheet. Once you place them onto the baking sheet put them in the freezer for 5 minutes.

Bake at 350* for 8 minutes (for thin cookies) and up to 10 for slightly thicker cookies.
Let the cookies cool before filling!

Cream Filling
Ingredients 

1 teaspoon plus 1/4 teaspoon of unflavored gelatin
2 tablespoons of COLD water
(Bowl of hot water)
1/2 cup of shortening (such as Crisco)
1 teaspoon vanilla
2 and 1/2 cups of powdered sugar

Stir together the gelatin and cold water in a small bowl or cup. Place the cup/bowl into the hot water and let sit for 5 minutes or until the mixture become transparent (it will not be completely clear depending on the brand you are using).  Remove the cup from the hot water and let it sit for 5 minutes.

In a medium size bowl beat the shortening until it starts to become fluffy
Add the vanilla
On LOW speed, a few heaping tablespoons at a time, add the powdered sugar
Once all of the powdered sugar has been incorporated add in the gelatin mixture
Make sure that everything has mixed together

To make the cookie sandwiches place about a teaspoon of cream filling onto an upside down cookie, add a second cookie right side up and gently press together. And voila! Homemade Oreo cookies :)

If you make your cookies about the size of the original you will end up with about 30 cookie sandwiches. I made my cookies a bit on the thicker side and had 24 cookie sandwiches!

Enjoy!

Wednesday, August 25, 2010

Strawberry Shortcake! And no... I don't mean the cartoon character

Strawberry shortcake is one of those desserts that, when done correctly, just makes you feel good. The elements are simple: a piece of sponge cake, strawberries and whipped cream... but the results are just amazing. There is something wholesome about it - the strawberries are sweet, but not too sugary; the whipped cream is light and fluffy and the cake can be anything you want from a homemade sponge cake dessert shell to a slice of pound cake. (And the best part is you can load it up with strawberries and pretend to be eating healthy!)

There are a few simple steps you can take in the kitchen that will bring your strawberry shortcake from run of the mill to amazing! The first is the whipped cream. Sure, they sell it in canisters in the market and you could go that route, but you know what they sell just above it? Small cartons of whipping cream. For just about the same price you can have the REAL stuff, not something that sprays out of a can! The full "recipe" is below but the idea is pretty simple. A bowl, a hand held mixer, the cream, a little bit of sugar, a little bit of vanilla, 3 minutes of your time and voila! you are done!

Tip number two has to do with the strawberries themselves. How sweet you want your strawberry puree to be is entirely up to you. If you are looking to get the puree fairly sweet try adding a few drops of lemon juice or a little bit of lemon zest. The flavor from the lemon will bring out the taste of the sugar making it seem like you have used a lot more sugar than you actually did. A win-win!

So good luck with the recipe and Enjoy!!

Sponge Cake Dessert Shells
Ingredients
1/2 cup milk
2 teaspoons of unsalted butter (plus more for greasing the pan)
8 large eggs
1 cup of sugar (plus more for dusting greased pan)
1 cup of all purpose flour
1 teaspoon of baking powder
1/8 teaspoon of salt
1 teaspoon of pure vanilla extract

Directions
Preheat your oven to 350*. In a small sauce pan heat the milk and the 2 teaspoons of butter over medium-low heat until it is just about ready to boil (you want the milk to be very warm and the butter to be melted). With an electric hand held mixer (or a stand mixer) fitted with a whisk attachment, beat the eggs and the 1 cup of sugar in a large mixing bowl at medium-high speed. You want the mixture to appear pale yellow, thick and look as if it has tripled in volume. This can take 7-8 minutes. While the egg mixture is working sift together the flour, baking powder and salt in a small mixing bowl. When the egg mixture is finished, turn the speed to low and slowly pour in the milk and butter. Then add half of the flour mixture, blending by hand with a spatula until it is just incorporated. Be careful not to over mix the batter. Repeat with the other half. Add the vanilla and mix gently. This batter will look watered down
The fully mixed batter

Grease a 17x12 baking pan, jelly roll pan, dessert shell pan or a muffin tin with the butter or spray and sprinkle evenly with the sugar. (If using a muffin tin, you can also just use liners). Pour the batter evenly into the pan of your choice.
Bake until the cake springs back when touched - about 15 minutes for the baking sheet and pan and 17-20 minutes for the dessert shells and muffin tin. Cool for 2 minutes in the pan and then gently flip out onto a cooling rack. Allow to cool completely.
The dessert shells cooling in the pan

The shells and "muffins" waiting their turn on the cooling rack

Strawberry Puree
Ingredients
1lb of strawberries (minus a few for garnishing)
1 tablespoon of sugar
a few drops of lemon juice or lemon zest

Directions
After washing and cutting the tops off of your strawberries use whatever method of mashing you want! A fork, a potato masher, a food processor. When you have reached your desired consistency stir in the sugar and lemon juice. (Add more sugar and lemon juice to taste!)

Whipping Cream
Ingredients
1 pint of whipping cream
2 tablespoons of sugar
1 teaspoon of pure vanilla extract


Directions
Put all ingredients into a mixing bowl. Use a stand mixer with a whisk attachment or a hand mixer (this can also be done using an old fashioned, hand operated egg beater, but it takes a long time and a lot of patience!). Mix until soft peaks can be formed.

Doesn't that look so much better than something out of a can?!
Now all that is left is to assemble your masterpiece! The best part is you can plate it any which way you want. I prefer the shell, some strawberry puree (so that it seeps into the shell... yummy) topped with some whipped cream and served with some more whipped cream and a strawberry on the side!
So... who's coming over to join me for dinner LOL

Monday, August 23, 2010

Nothing to yolk about

Unless you have been living under a rock for the last few days, it is a pretty safe bet that you have caught wind of the massive egg recall thanks to a nasty outbreak of salmonella. Contrary to my amazingly witty/funny blog title it is a pretty darn serious issue. 500 million eggs have been recalled and it has become the latest "breaking news headline" on all of the 24 hour news stations. All of a sudden everyone knows the exact names of the farms where the eggs originated and for a lot of people it is probably the first time they have ever cared where the eggs they purchased came from.

But why does it take a food disaster for everyone to start caring where the food on their plate originated?

Being aware of whats in your food and where it comes from is a very empowering experience. Sure, its not always possible - its not like every apple is stamped with a farm's logo (how creepy would that be?) but even knowing if your produce is a product of California, Florida, Mexico or Argentina is a giant step in the right direction. (And sadly, not every farm or production factory keeps the same standards as you have for your own kitchen.)

So as we get this new week off to a start with all sorts of baking adventures, try being slightly more concerned about not only where your eggs come from, but your other food items as well. Spend some time reading back labels to learn more than just the calorie count. You might find yourself surprised at not only where your food comes from but what is in it as well.

Friday, August 20, 2010

Champagne Brunch

Is there any meal out there more amazing than brunch?

I didn't think so.

The possibilities are endless... breakfast foods, lunch foods, coffee, champagne. Amazing! According to some extensive research on Wikipedia I have learned that the phrase was first used in Britain around 1896 in Hunter's Weekly, but there seems to be some debate on if that was actually the first reference. If you care to read more you can check out the article here.

With the weekend only hours away I thought you all might enjoy a classic quiche recipe to try the next time you are hosting a Sunday (or Saturday!) brunch. This recipe is for a basic cheese quiche but there are endless possibilities for what you can add. A rule of thumb to always remember when adding fillings to a quiche: If you put it in raw it will come out raw. Since quiche is an egg custard the temperatures will not get hot enough to cook the bacon, ham or broccoli you want to add. So if you decide to add anything additional to the recipe just make sure to cook it first :)

For this recipe we are just going to focus on the filling so feel free to use your favorite pie crust recipe! You will want to pre bake your crust so that it is just about golden brown. This will keep you from ending up with a beautiful custard and a soggy crust.

Ingredients (for a 9 inch quiche)
2 1/2 cups of half and half
5 eggs
2 tablespoon of salt (more or less depending on your preference - remember you are not just seasoning the top of the liquid but the entire quiche)
2 tablespoon of pepper
1 teaspoon of nutmeg
4 tablespoons of mustard plus more to brush on bottom of crust
1 cup of grated cheese (mozzarella and gruyere work well)

Optional additional ingredients (ham, bacon, spinach)

Directions
Whisk the eggs in a mixing bowl
Add the half and half and whisk until well mixed
Add in salt, pepper, nutmeg, and mustard and give a quick whisk

Take your pre baked crust and brush a small amount of mustard along the bottom. Put 3/4 of your cheese in the bottom (and 3/4 of your other toppings). Fill the crust with the egg mixture leaving about 1/8 inch along the top. Add additional cheese to the top (and the rest of your other toppings)

Bake at 375* for 35-45 minutes or until the egg mixture has set!

Quiche is best served warm and not pipping hot out of the oven :) and goes well with any champagne based beverage.

A personal sized quiche!

Cheers! And have a great weekend.

Wednesday, August 18, 2010

Patience is a virtue...

Baking is sometimes a funny little thing. One small wrong move and you can completely destroy what you were making. Not enough yeast in your bread - uh oh! A little too much salt - yikes! The old adage goes "if cooking is an art then baking is a science" and you know what... it really is not that far off. In cooking you will often see things like "salt and pepper to taste" written in a recipe but when have you ever seen a cake recipe saying "flour to your desired thickness"?


Over the years as my baking skills improved I found myself trying more "professional" recipes and I started to notice one thing that they all had in common. Things were measured out by weight. <flashback to high school chemistry class with beakers and scales!> The more traditional a recipe was the more I noticed that the flour, the butter, the sugar, EVERYTHING was weighed in grams or ounces. It made me stop and think about how this can really change the outcome of what you are making. If you've ever played around with a digital scale you know that even a teaspoon can change the weight and I'm sure that no one pours a cup of sugar the same way twice (well, maybe Martha Stewart but who else has time to be that anal retentive?!)


Sure, there are a few baking recipes out there that you can play around with I mean who doesn't like a few extra chocolate chips floating around in that sea of cookie dough? For the most part baking recipes are tried and true and a slight variation will lead to slightly different results. If you have the patience to measure everything out accurately and add your ingredients at just the right time the possibilities to what you can create are endless.


If you are feeling up to the challenge :) making brioche is a process that will certainly put your patience to the test but in the end you will be rewarded with quite a treat. Brioche is a rich and tender bread that has a very high egg and butter content. If you play your cards right it is the type of bread you can serve at your next dinner party to leave your guests wondering just where you learned how to cook so well.

Brioche (please note that this dough will take two days to prepare)


The perfect size loaf for a dinner gathering can be made in a 1.5lb loaf pan. If you don't have multiple loaf pans at home go and grab the disposable kind you see at the supermarket (and you can reuse them!)

Ingredients:
1 tablespoon of Dry Yeast
1/4 cup of tepid water (think baby bottle warm)
2 ounces of sugar
1 and 1/2 teaspoons of salt
16 ounces of flour
5 large eggs
8 ounces of soft unsalted butter, divided into teaspoons (It is best to cut your butter while still cold and allow it to come to room temperature on a plate) 
Directions:
Put the two ounces of water into a small bowl, add yeast and a pinch of the sugar, mix and set aside to proof for 5 minutes.


In a stand mixer, on low speed with a dough hook attachment, combine flour, sugar and salt. Add yeast mixture. Slowly add eggs two at a time allowing eggs to become incorporated before adding more. You dough will begin to come together but will still look very rough. Once all eggs have been added place your mixer on medium speed and let it run for 7-8 minutes. Every few minutes stop the mixer to scrape down the sides of the bowl (while a stand mixer is great for a lot of things, it does not do well with scraping the sides of the bowl and you want to make sure that you have all of the flour in the dough).


At this point your dough should have come together nicely and start to resemble a bread dough. With the mixer still on medium add butter two teaspoons at a time. Allow the butter to be incorporated before adding more and stop every four additions to scrape down the sides of the bowl. This process should take around 8-9 minutes. Once all of the butter has been added allow the dough to mix for an additional two minutes. You should notice that your dough has now become very silky and shiny looking and will also be sticky.


Place the dough into a clean bowl (do not grease) and cover with a dry cloth (or plastic wrap). Let it rise in the room until it has doubled in size. The length of time it will take depends on the temperature of your room. A good way to tell when it is done rising is to poke your finger in the dough - if it springs right back at you it is not done, if it takes a second to come back you are good to go! When it is done rising dust your counter with flour and fully deflate the dough. Make sure to take your time pressing out all of the air bubbles. Place dough back into the bowl and cover with plastic wrap.

Place dough in the refrigerator for at least eight hours and up to 24 hours.

After the dough has risen again in the refrigerator take it out and fully deflate making sure to press out all the air bubbles.


Grease the inside of each loaf pan with butter or cooking spray. Weigh out 7 ounce portions of the dough; each loaf pan will be filled with 7 ounces. Once you have your portions work with one loaf pan at a time. Take your portion of dough and divide into four equal size sections (or as equal as you can get them). Roll each quarter portion into a small ball and then shape with your hands into a log. Place each log at the bottom of the loaf pan. (For a different look you can. also divide the 7 ounce portion into 8 little balls and place them in the bottom of each pan)
The dough balls and logs sitting in each pan!

Once you have repeated this process for all of your pans, cover them and leave them in the room to rise a third time. This should take 1-1.5 hours. Once your dough has risen brush an egg wash over the top and slice little slits along each section to give air a place to escape.
Amazing what an hour and half can do!

Bake in a 375 degree oven for 20-25 minutes or until golden brown. Allow bread to cool for at least 5-10 minutes before trying to slice it.
Don't be afraid of a golden BROWN crust - it adds a delicious texture to your bread


This bread is great served warm with dinner or toasted with your favorite jam. For the extremely adventurous who want to reward themselves with a true indulgence for having such great patience trying using this bread to make french toast and garnish with fresh berries! Enjoy!!

Monday, August 16, 2010

Kitchen Gadget Fun!

Kitchen gadgets... just the thought of fun new kitchen accessories puts a big ol' goofy smile on this girls face. Seriously, the possibilities are endless - spatulas, serving spoons, cake pans, oh my! A quick trip into Sur La Table on a Wednesday afternoon usually ends with me clutching a bag filled with treats wondering how I could have ever lived before my new... ummm... heart shaped egg poacher. (OK, I don't have a heart shaped egg poacher.... yet).

Seriously cute right?? Right?!


All joking aside, it is a great feeling when you find that one gadget that makes your life easier. The obvious choice for my favorite gadget is the KitchenAid mixer... but for this blog posting I'm going to consider that a full on appliance. (But I will say it is wonderful, it is amazing and I really don't know how I ever lived without one!).

During the summer months I am ALWAYS making fresh lemonade. There is something about a tall, cold glass of lemonade that is so refreshing on a hot and humid summer day. The downside to making fresh lemonade?? Squeezing all of those lemons. I've tried every way possible - squeezing by hand, the fancy (expensive) electric juicer, the the hand operated stainless steel juice press, the hand held juicer and finally... the one that worked best... the citrus reamer! It may seem old fashioned but for just about $6 you can pick one up and not feel guilty about splurging. I find that they are great for getting out every last drop of juice and are super easy to use.

Simple, easy to use, and best of all - cheap!


So what's your favorite kitchen gadget?

Easy Lemonade Recipe

1 cup fresh squeezed lemon juice (depending on the size of the lemons this could be 6-8)
6 cups of cold water
1/2 - 3/4 cup of sugar (feel free to add more or less to taste!)

Mix all ingredients in a pitcher, chill, enjoy!

You can take this basic lemonade recipe and make flavored lemonades by straining in fruit purees. Raspberry is a great, refreshing addition.